Install WHM/cPanel
This integration works with HSPs, Resellers, and Marketplaces.
Installing the plugin
We recommend managing Blackwall via GateKeeper directly or one of Blackwall's integration modules, not both. Running them concurrently can cause configuration conflicts and complicate troubleshooting. Pick one interface and use it consistently for all changes. This matters especially in hosted environments, where service providers don't have access to customer integration module instances.
BotGuard provides a WHM/cPanel integration plugin that enables hosting providers to offer Blackwall protection to their customers. After installing the plugin, a WHM administrator can create bespoke Blackwall packages by selecting the components and component functions to include, based on the required service level, customer needs, and budget.
When a package is assigned to a customer account, the corresponding Blackwall components and features are made available to the customer. cPanel users can then access and configure only the Blackwall features made available through their assigned package.
The WHM/cPanel plugin has historically run on CentOS, but most modern deployments now use AlmaLinux or Rocky Linux as drop-in replacements. All of these distributions, as well as RHEL, use the RPM package format and are binary compatible. This means the RPM instructions below apply to any of these systems. Ubuntu is also supported, though perhaps less commonly used in production environments.
The module is installed and updated in the standard way, using an SSH connection to the WHM server. Choose a tab below that corresponds to your system:
-
Import the BotGuard package digital signature key. This ensures that the packages you install are verified and have not been tampered with:
-
Add the BotGuard repository to your system. This tells your package manager where to find BotGuard packages:
-
Clear the package cache. This ensures that outdated metadata is removed before installing:
-
Install the Blackwall WHM / cPanel plugin and required Apache modules. The
ea-apache24-mod_botguardmodule will also be installed as a dependency:
-
Import the BotGuard package digital signature key (keyrings method). This ensures that the packages you install are verified and have not been tampered with:
-
Add the BotGuard repository to your system. This tells your package manager where to find BotGuard packages:
-
Update the package list.
-
Install the Blackwall WHM / cPanel plugin. This will also install the Apache module as a dependency:
Configuring the plugin
The plugin is disabled after performing the installation steps above. Before using the plugin, it must be configured using one of two possible methods:
- Configure plugin via the UI.
- Configure plugin using a configuration file.
Click the appropriate tab below to read instructions for the chosen configuration method:
To configure the plugin, perform the following steps:
- Log into your WHM interface:
- Using your preferred browser, enter the IP address or domain name followed by the 2087 service port in your preferred browser (for example, https://192.0.2.1:2087).
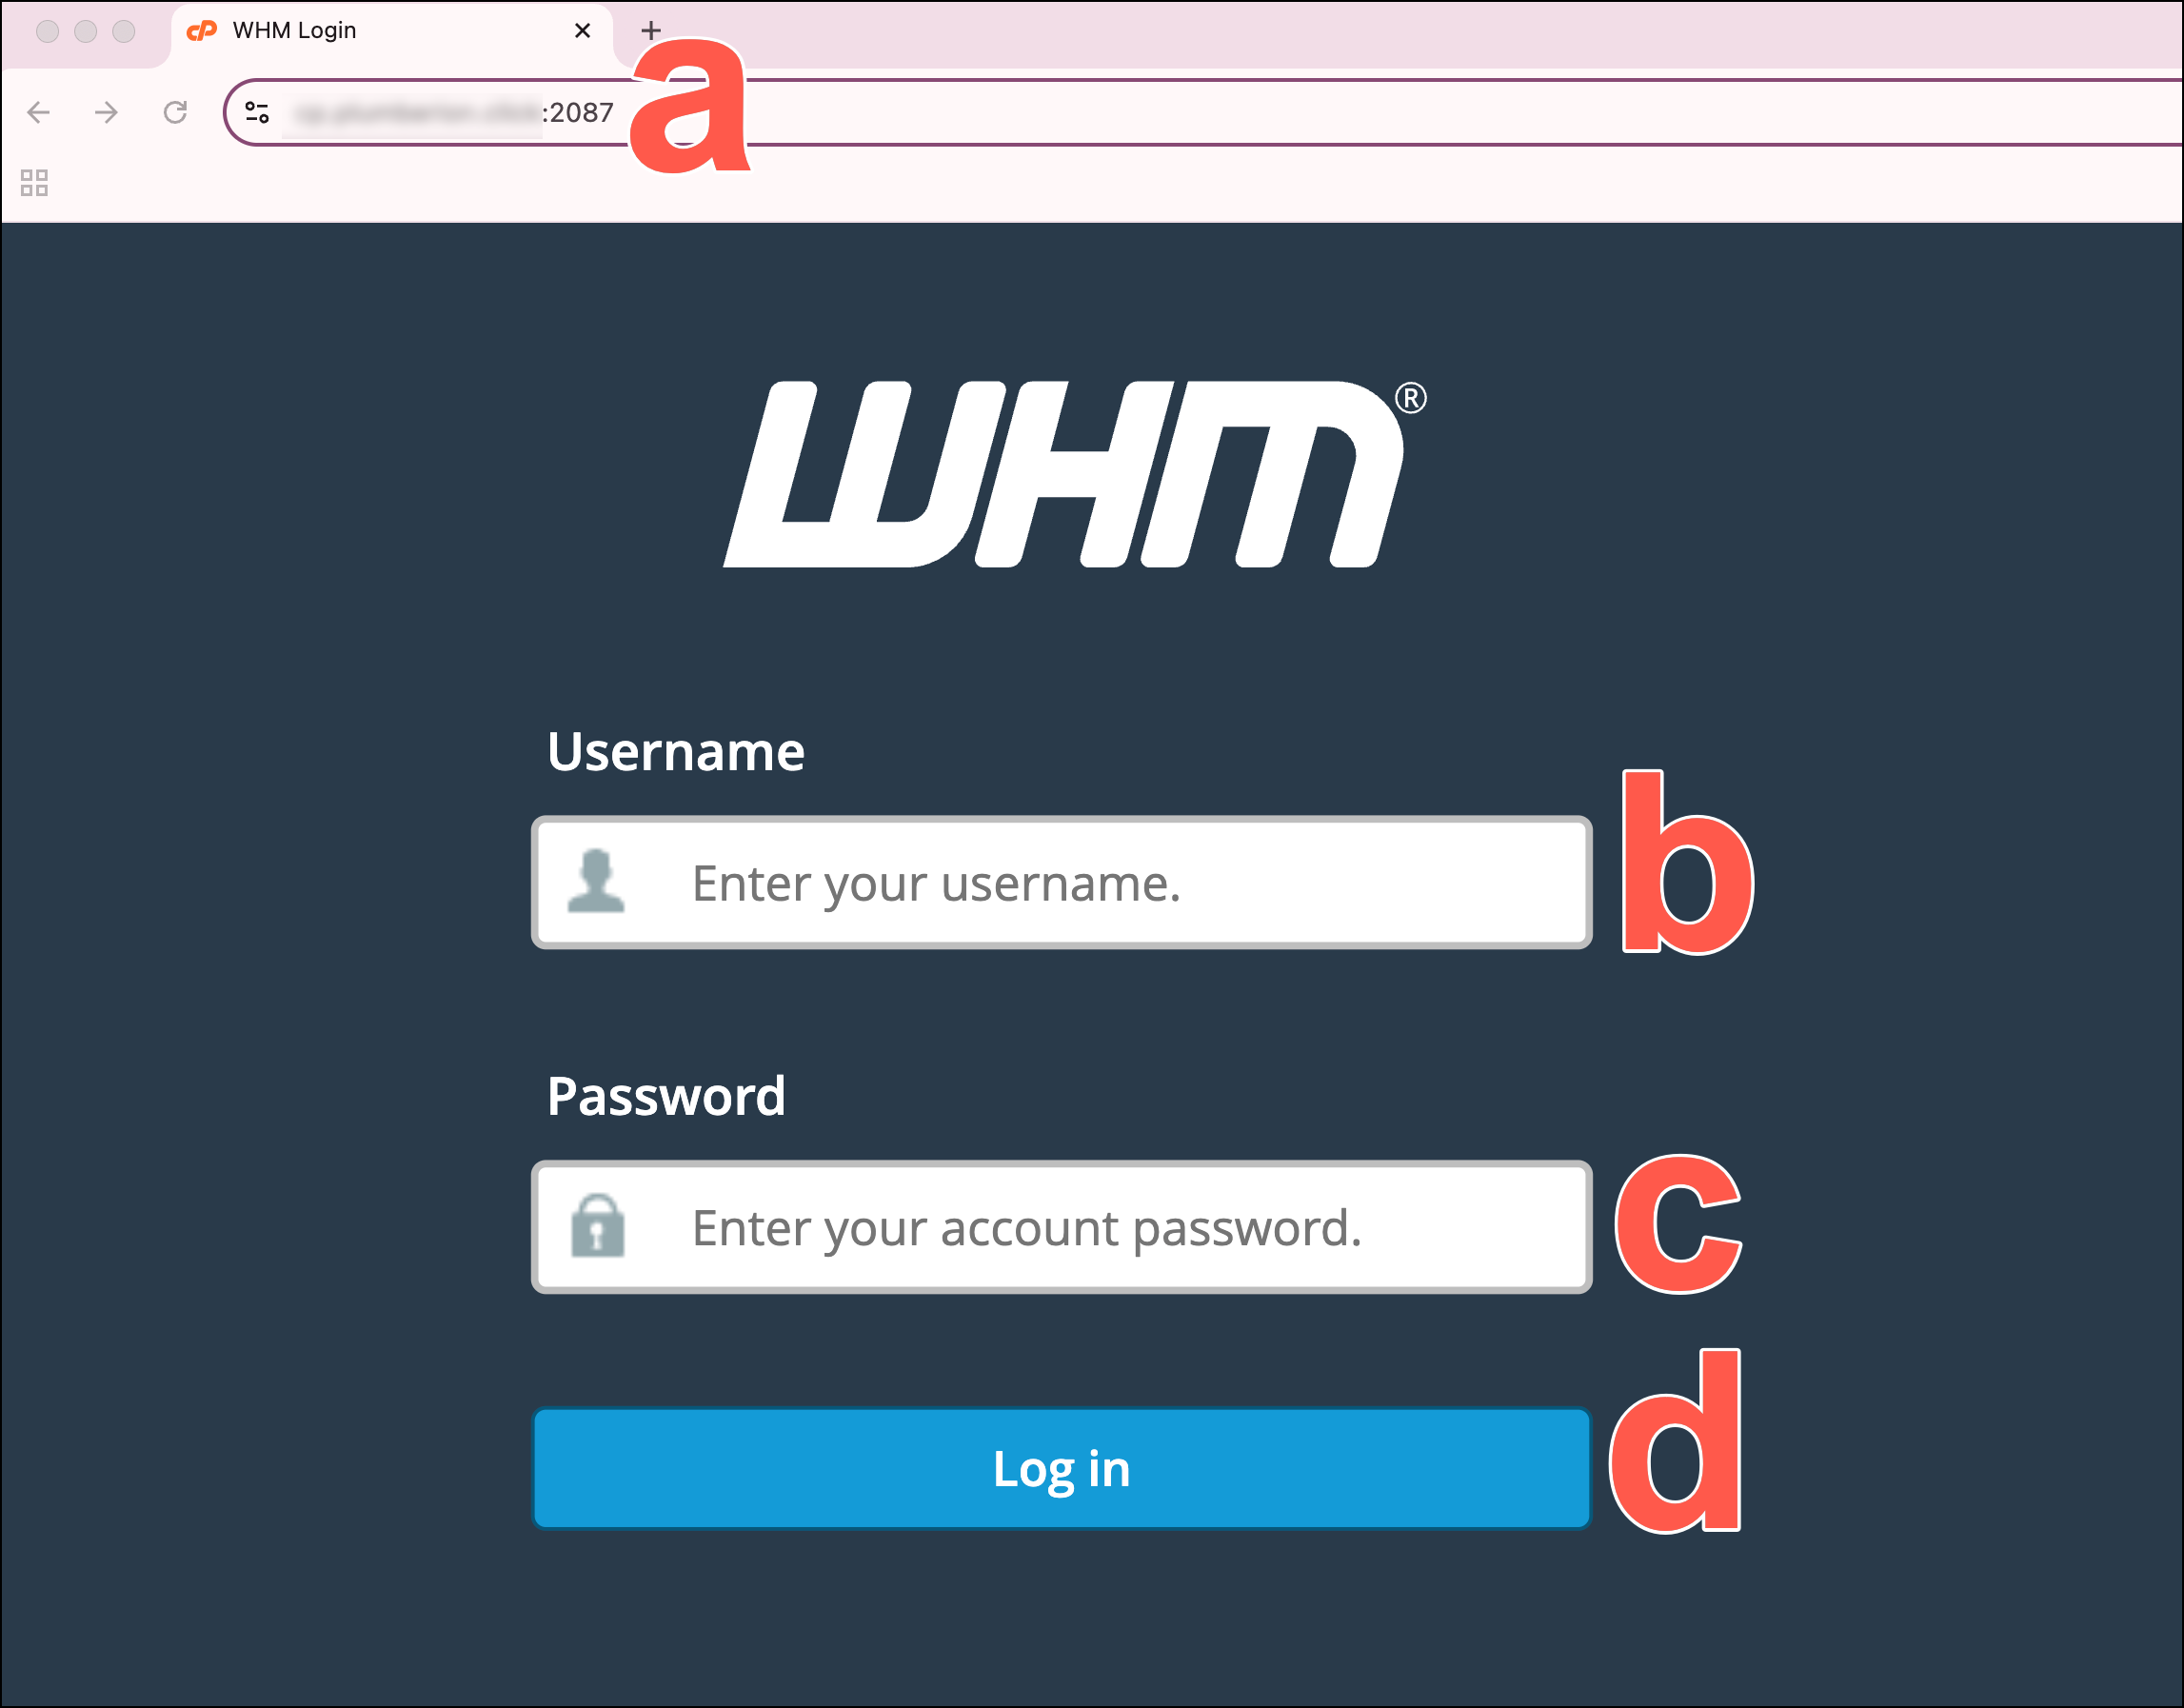
- When the login screen displays, enter your WHM username in the Username field.
- Enter your password in the Password field.
- Click Log in.
- Using your preferred browser, enter the IP address or domain name followed by the 2087 service port in your preferred browser (for example, https://192.0.2.1:2087).
- In the left sidebar, scroll to the Plugins section and click Blackwall Protection. Alternatively, use the search bar at the the top of the sidebar to search for Blackwall Protection.
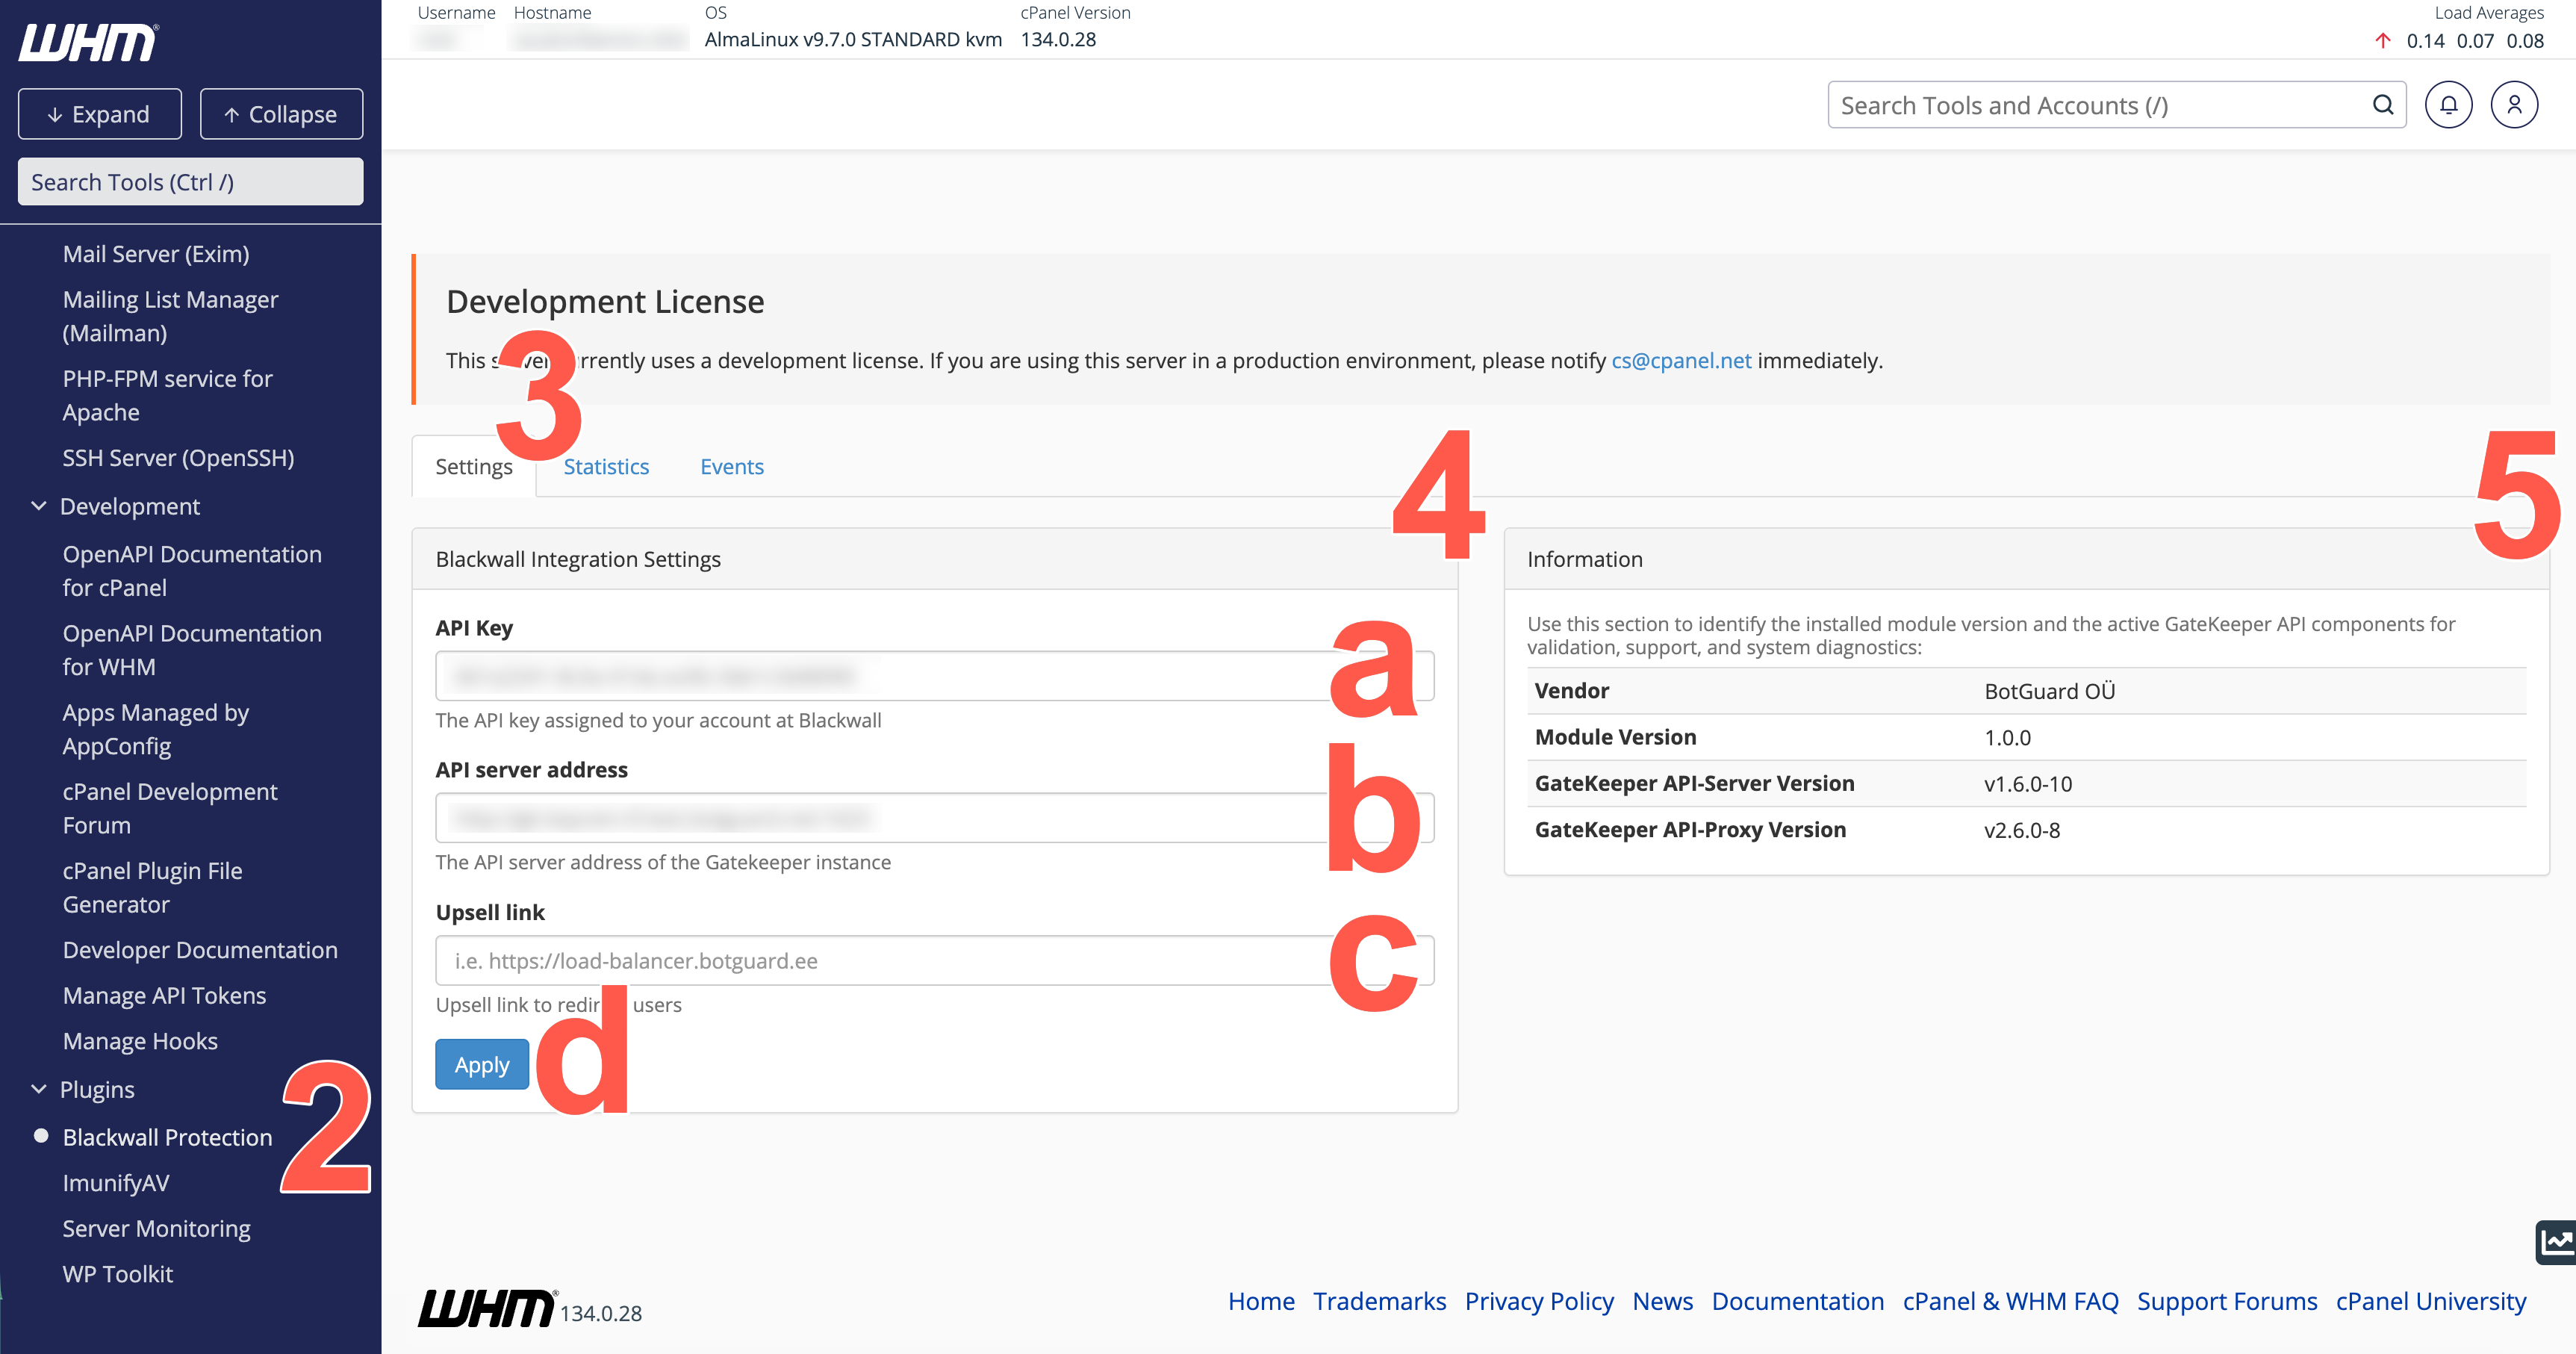
- From the tabs available, select Settings.
- Set up the plugin using the following steps. After execution, if any error is displayed, check the API key and server addresses.
- Paste your API Key, which is copied from your Blackwall dashboard. Refer to Blackwall account credentials for guidance how to access your API key.
- Paste your API server address. The plugin uses this to automatically fetch the IP addresses of Gatekeeper servers via its DNS results.
- In the Upsell link field, paste the full URL (include https://) of the page where you want cPanel users to land if they try to access premium/paid Blackwall services.
- Click Apply.
- Optionally, review the plugin version and active GateKeeper API components, which is particularly useful for validation, support, and system diagnostics.
-
To create a package with Blackwall features, perform the following actions:
- In the left sidebar, scroll to the Packages section and click Add a Package. Alternatively, use the search bar at the the top of the sidebar to search for Packages and from the filtered sidebar, click Add a Package.
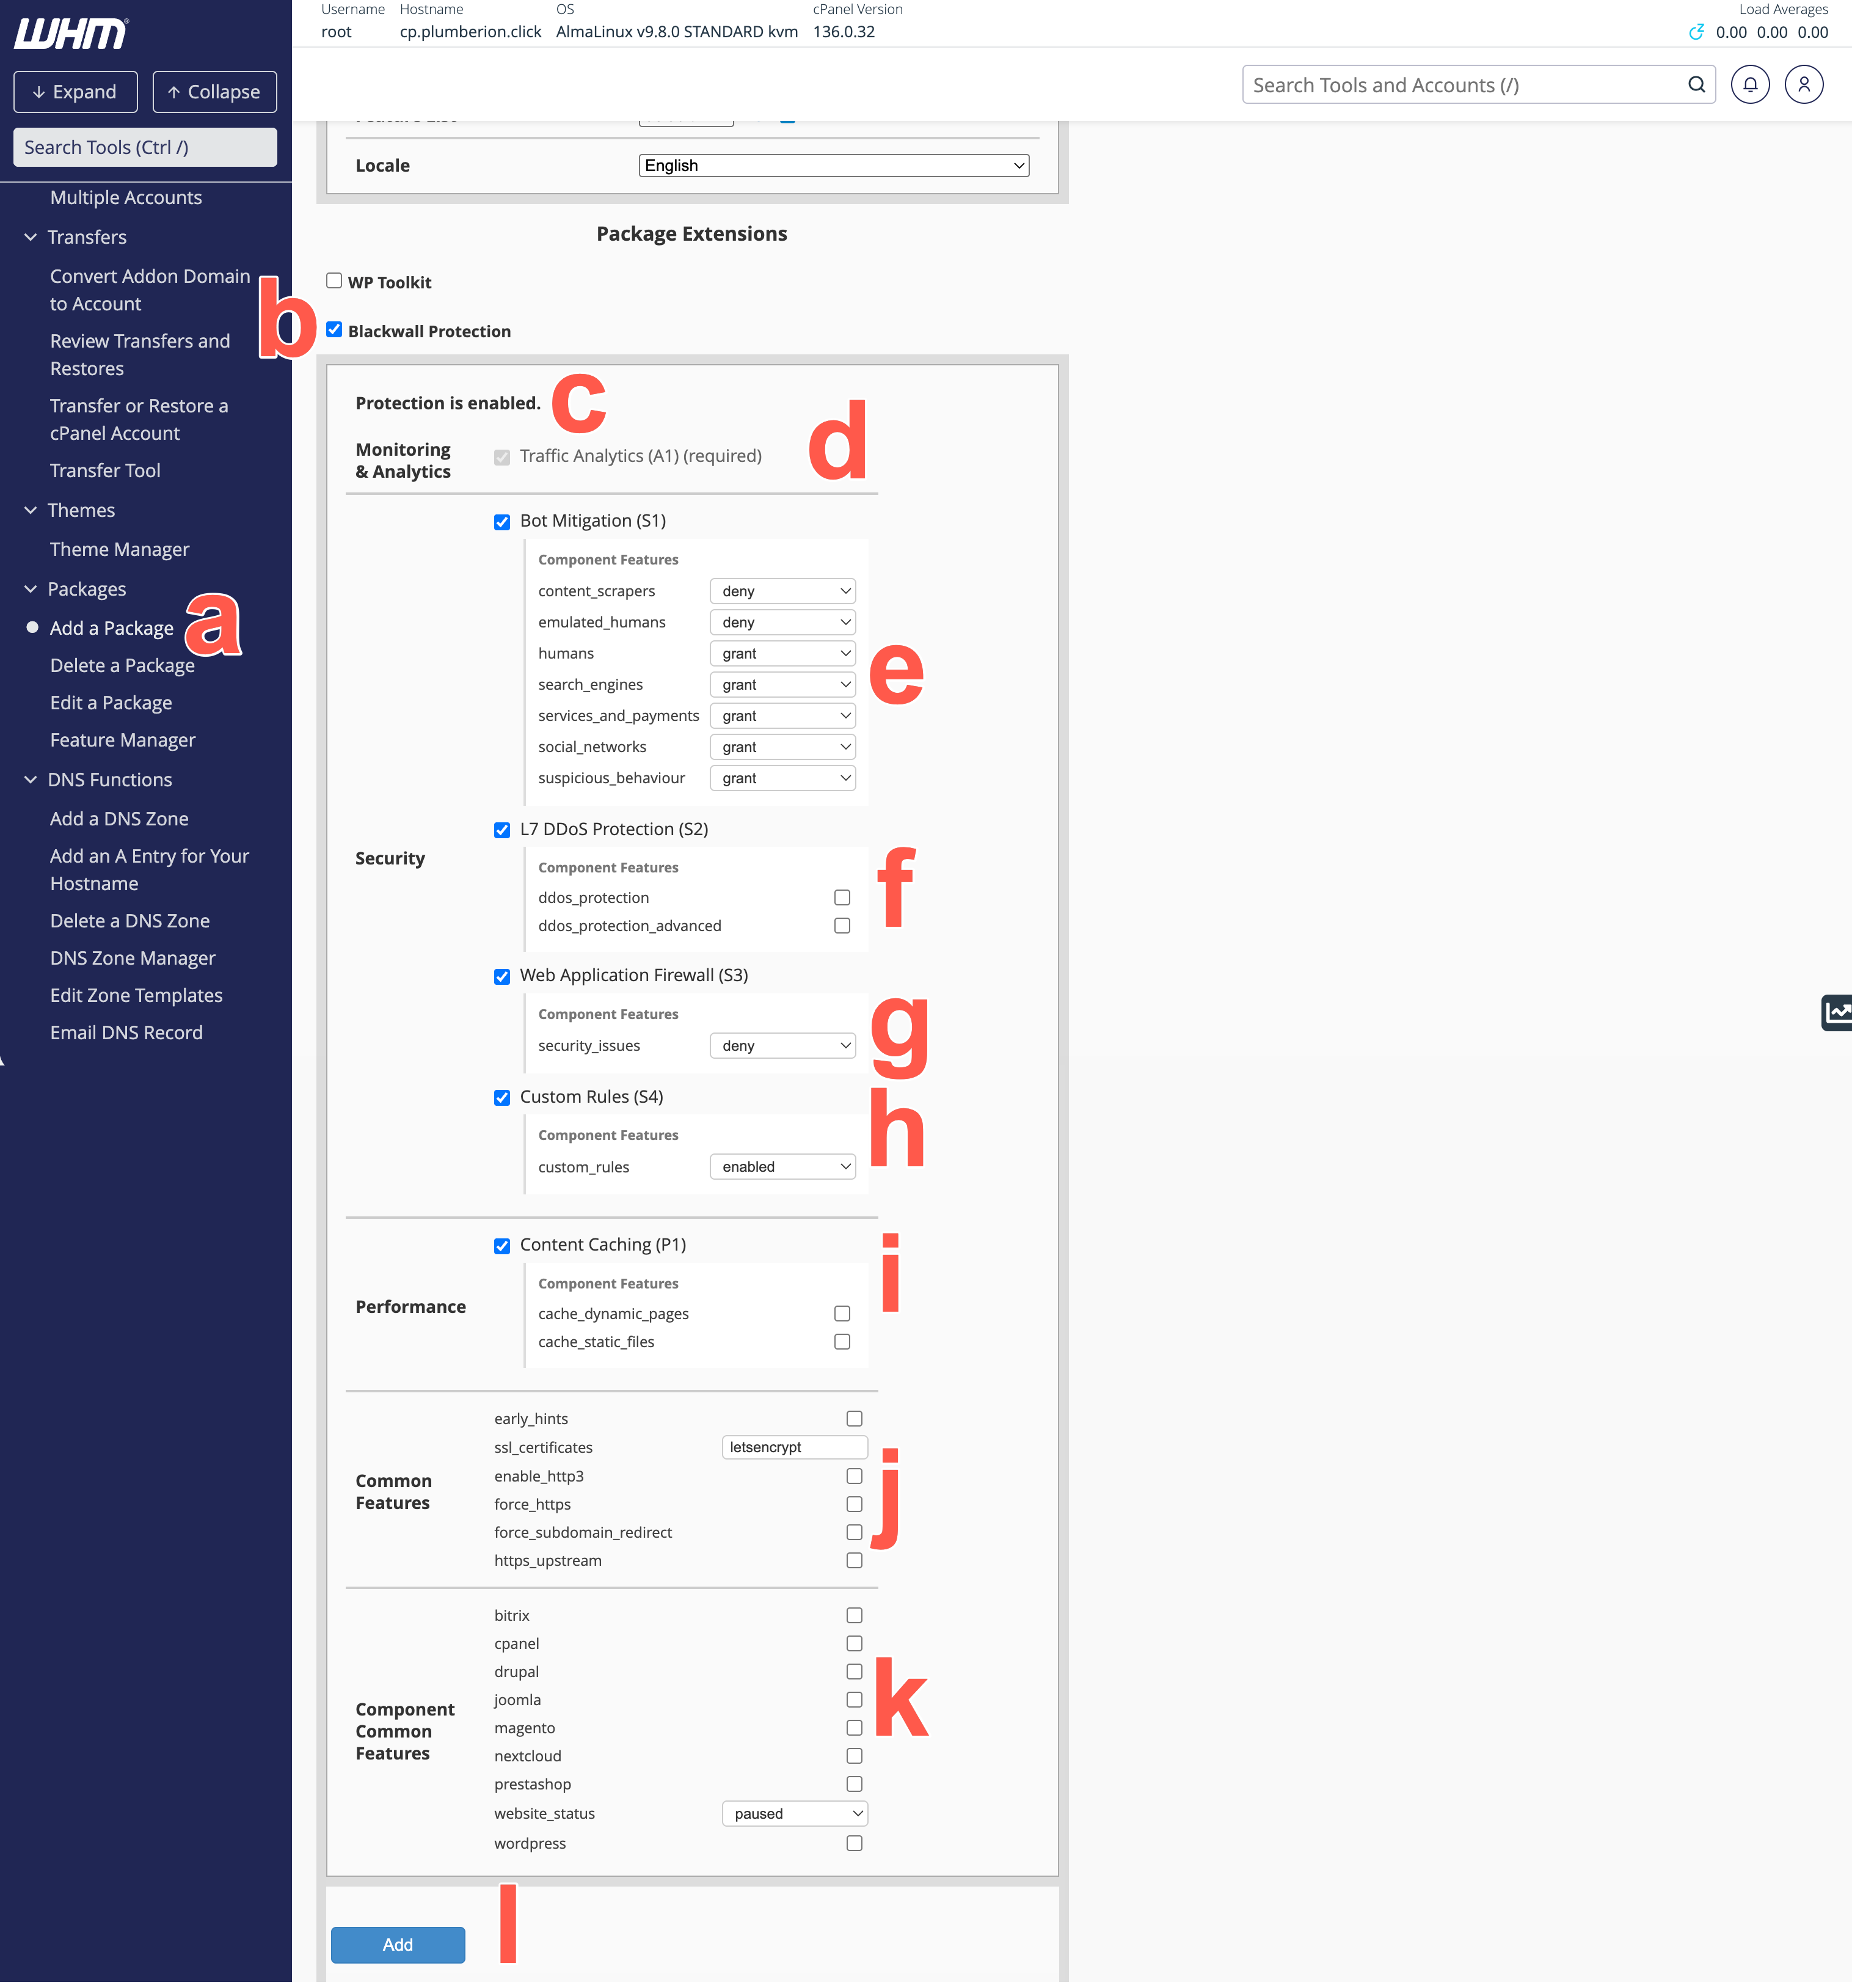
- After completing the general domain-related configuration fields for the package, to enable Blackwall protection for the customer's domain, place a check/tick in the checkbox that corresponds with Blackwall Protection. New options now reveal to enable you to configure Blackwall protection components and features that you wish to make available to your customer.
- In the Blackwall Protection panel, confirm that protection is enabled.
- For the section Monitoring & Analytics, Traffic Analytics (A1) is included as a mandatory monitoring component and cannot be edited/cleared.
-
For Bot Mitigation (S1) in the Security section:
- Place a check in the Bot Mitigation (S1) checkbox, if you wish to include this component.
-
Once selected in the previous step, options for eight core rules display. Locate the rule that you wish to modify.
Description of Blackwall core rules
We recommend that you grant access to the following:
-
search_engines - Search engine crawlers such as Google, Bing, Yahoo, and other indexing services that scan websites to discover and rank content in search results. These bots are generally considered trusted traffic and are important for SEO visibility, search discoverability, and content indexing. Administrators can choose to allow or deny access depending on business or security requirements.
-
social_networks - Bots and crawlers operated by social media platforms such as Facebook, X (Twitter), LinkedIn, and others. These services typically access websites to generate link previews, retrieve metadata, or analyse shared content. Allowing these visitors helps ensure correct rendering of shared links and social media integrations.
-
services_and_payments - Automated traffic originating from recognised cloud-based services, infrastructure providers, or monitoring platforms. This category may include uptime monitoring tools, performance scanners, analytics platforms, and other legitimate cloud-hosted services. Depending on your environment, these services may be required for monitoring, integrations, or operational visibility.
-
humans - Typical human visitors accessing the website through desktop browsers, mobile devices, or office networks. This category represents normal end-user traffic and is generally expected to have unrestricted access to website resources. Additional protections, such as content encryption, can be applied to secure content delivery and reduce automated analysis of sensitive page content.
We recommend that you deny access in the remaining four rules:
-
content_scrapers - Automation tools designed to collect, copy, analyse, or archive website content at scale. These visitors are commonly associated with data scraping, competitive intelligence gathering, AI dataset collection, or automated content harvesting. Depending on business requirements, administrators may choose to block these visitors, challenge them with CAPTCHA, or apply content encryption to help protect sensitive or proprietary content.
-
emulated_humans - Advanced automation frameworks and next-generation bots that attempt to mimic legitimate browser behaviour in order to bypass traditional bot detection mechanisms. These visitors may simulate mouse movement, browser execution, session handling, or other human-like interactions. Because these bots are often associated with credential abuse, scraping, or automated attacks, they typically require stricter mitigation measures such as CAPTCHA enforcement, encryption, or access denial.
-
suspicious_behaviour - Visitors exhibiting unusual, abnormal, or potentially abusive behaviour patterns detected by Blackwall’s analysis engine. This category may include excessive request rates, behavioural anomalies, suspicious navigation patterns, or activity commonly associated with automated abuse or account compromise attempts. Administrators can apply additional protections such as CAPTCHA challenges, encryption, or outright blocking to reduce the risk posed by suspicious traffic.
-
-
For the rule that you choose to modify, select a dropdown field that corresponds to your desired behaviour. The available dropdown options are:
- Grant access
- Deny access
-
For L7 DDoS Protection (S2) in the Security section, select one type of protection to implement in your package by placing a check in the corresponding checkbox:
- ddos_protection - Enables basic Layer 7 DDoS mitigation for the protected domain by limiting the number of simultaneous connections and the rate of requests from a single IP to help prevent volumetric or application-layer DDoS floods.
- ddos_protection_advanced - Enables additional Layer 7 DDoS protection for more advanced application-layer attacks. If enabled, GateKeeper will block attacking IPs at the firewall level for the entire cluster—returning a TCP RST or UDP rejection instead of serving HTTP 403 pages. Use this only if your site has experienced large-scale DDoS events.
- Optionally, place a check in the Web Application Firewall (S3) checkbox in the Security section. Then use the dropdown field to select whether you want to grant or deny associated security_issues.
-
Optionally, place a check in the Custom Rules (S4) checkbox in the Security section. Then use the dropdown field to select whether you want to enable or disable the custom-rules feature.
Custom Rules are different to Blackwall's Core Rules. Whilst our default Core Rules greatly decrease bot traffic for your website(s), some visitor behavior might still present a cause for concern. This is where our Custom Rules engine can help you to eliminate those visitors from accessing your website. The Custom Rules engine may be used for bespoke purposes, but the main two purposes are:
- Whitelisting (unblocking) of currently blocked services and clients.
- Blocking of services and clients that currently have access to your site.
-
In the Performance section, select Content Caching (P1) when the package should include Blackwall content-caching capabilities. Then from the available features, optionally choose one or both:
- cache_dynamic_pages - If checked, GateKeeper also caches HTML pages and other 'dynamic' content for a configurable short period. Use with caution: caching dynamic content may cause delays in showing newly published data (e.g., blog posts, user-specific pages).
- cache_static_files - If checked, GateKeeper caches images, CSS, JavaScript, and other static files locally on the edge. This speeds up asset delivery and reduces load on your origin server.
-
In the Common Features section, configure the default feature settings to apply to websites assigned to the package. Depending on the available Blackwall API functions, these settings can include:
- early_hints — Allows GateKeeper to send HTTP 103 “Early Hints” responses during the initial TLS handshake, so that browsers can start preloading resources (e.g., CSS/JS) before the final HTML is delivered. This improves load times, leading to a faster browsing experience.
- ssl_certificates — Specifies the SSL certificate configuration, such as letsencrypt.
- enable_http3 — Enables HTTP/3 support for compatible browsers and clients. GateKeeper will speak HTTP/3 (QUIC/UDP) to compatible clients, improving performance on modern browsers and mobile devices. Leave unchecked if you need to disable HTTP/3 for compatibility or DDoS concerns.
-
force_https - Enable to automatically redirect all incoming HTTP (port 80) requests to HTTPS (port 443). When enabled, GateKeeper also adds security headers and rewrites
http://references in response bodies tohttps://. The recommended long-term solution is to configure the application to generate HTTPS URLs directly.Disable response-body rewriting while retaining Force HTTPS
If you need to keep HTTP-to-HTTPS redirection enabled but prevent GateKeeper from rewriting
http://URLs in response bodies:-
Back up the domain configuration:
-
Find each occurrence of:
-
For each occurrence found, comment it out:
-
Do not modify:
Leave Force HTTPS enabled.
-
Reload the NGINX configuration or restart the service.
Warning
HTTP URLs generated by the application may cause mixed-content warnings if they are used to load browser resources.
Updating the application to generate HTTPS URLs directly is the recommended long-term solution.
-
-
force_subdomain_redirect — Enables the configured subdomain redirection behaviour.
- https_upstream — Uses HTTPS when Blackwall connects to the upstream server. Clear this checkbox if Blackwall should connect to the upstream server over HTTP.
-
In the Component Common Features section, select any shared features that you want to include. Common features are features available in more than one selected component. For example, if the same feature is available in both components S1 and S3, it appears once under Component Common Features rather than being listed separately under each component.
- Review the selected components and optional features, and click Add to complete configuration of your new package.
- In the left sidebar, scroll to the Packages section and click Add a Package. Alternatively, use the search bar at the the top of the sidebar to search for Packages and from the filtered sidebar, click Add a Package.
The selected components and features determine which Blackwall security capabilities are assigned to websites using this package and made available to the corresponding cPanel users. These values are saved as the package defaults and applied to new and existing Blackwall websites associated with the package.
Note
You can create multiple packages containing different combinations of Blackwall components and default feature settings. This enables you to provide different protection levels according to customer requirements, service tiers, and budgets.
When a package is assigned to a cPanel account or domain, its selected components and default settings are applied to the associated Blackwall website. Changing the assigned package updates the Blackwall capabilities available to that customer.
Following successful execution of the previous steps, each associated cPanel account gains access to the Blackwall Protection settings in the cPanel web control panel. Refer to Using the plugin for instructions how to access and use the plugin.
Blackwall facilitates automated deployment of our cPanel module, which is ideal for hosting providers who often deploy many servers per day. To enable UI configuration to be overridden by a configuration file, perform the following steps:
-
On each cPanel server where the Blackwall module is installed, use the following commands in sequence to create a Blackwall directory and restrict access to the root user:
-
Create a server-wide JSON configuration file with content similar to this example:
-
Save the configuration file to the Blackwall directory created in step 1. Name the file:
config.json.Note
- Where the file exists, it will be used and the GK configuration screen in the UI will be hidden.
- If the file is removed at some point in the future, at the next cPanel login, you will be required to provide configuration via the UI, or replace the configuration file to the same location.
- If the file is created after configuration in the UI, note that the configuration file settings take precedence; i.e. the file always overrides UI configuration.
-
To create the package, you still must log into your WHM interface:
- Using your preferred browser, enter the IP address or domain name followed by the 2087 service port in your preferred browser (for example, https://198.51.100.0:2087).
- When the login screen displays, enter your WHM username in the Username field.
- Enter your password in the Password field.
- Click Log in.
- Using your preferred browser, enter the IP address or domain name followed by the 2087 service port in your preferred browser (for example, https://198.51.100.0:2087).
-
To create a package with Blackwall features, perform the following actions:
- In the left sidebar, scroll to the Packages section and click Add a Package. Alternatively, use the search bar at the the top of the sidebar to search for Packages and from the filtered sidebar, click Add a Package.
- After completing the general domain-related configuration fields for the package, to enable Blackwall protection for the customer's domain, place a check/tick in the checkbox that corresponds with Blackwall Protection. New options now reveal to enable you to configure Blackwall protection components and features that you wish to make available to your customer.
- In the Blackwall Protection panel, confirm that protection is enabled.
- For the section Monitoring & Analytics, Traffic Analytics (A1) is included as a mandatory monitoring component and cannot be edited/cleared.
-
For Bot Mitigation (S1) in the Security section:
- Place a check in the Bot Mitigation (S1) checkbox, if you wish to include this component.
-
Once selected in the previous step, options for eight core rules display. Locate the rule that you wish to modify.
Description of Blackwall core rules
We recommend that you grant access to the following:
-
search_engines - Search engine crawlers such as Google, Bing, Yahoo, and other indexing services that scan websites to discover and rank content in search results. These bots are generally considered trusted traffic and are important for SEO visibility, search discoverability, and content indexing. Administrators can choose to allow or deny access depending on business or security requirements.
-
social_networks - Bots and crawlers operated by social media platforms such as Facebook, X (Twitter), LinkedIn, and others. These services typically access websites to generate link previews, retrieve metadata, or analyse shared content. Allowing these visitors helps ensure correct rendering of shared links and social media integrations.
-
services_and_payments - Automated traffic originating from recognised cloud-based services, infrastructure providers, or monitoring platforms. This category may include uptime monitoring tools, performance scanners, analytics platforms, and other legitimate cloud-hosted services. Depending on your environment, these services may be required for monitoring, integrations, or operational visibility.
-
humans - Typical human visitors accessing the website through desktop browsers, mobile devices, or office networks. This category represents normal end-user traffic and is generally expected to have unrestricted access to website resources. Additional protections, such as content encryption, can be applied to secure content delivery and reduce automated analysis of sensitive page content.
We recommend that you deny access in the remaining four rules:
-
content_scrapers - Automation tools designed to collect, copy, analyse, or archive website content at scale. These visitors are commonly associated with data scraping, competitive intelligence gathering, AI dataset collection, or automated content harvesting. Depending on business requirements, administrators may choose to block these visitors, challenge them with CAPTCHA, or apply content encryption to help protect sensitive or proprietary content.
-
emulated_humans - Advanced automation frameworks and next-generation bots that attempt to mimic legitimate browser behaviour in order to bypass traditional bot detection mechanisms. These visitors may simulate mouse movement, browser execution, session handling, or other human-like interactions. Because these bots are often associated with credential abuse, scraping, or automated attacks, they typically require stricter mitigation measures such as CAPTCHA enforcement, encryption, or access denial.
-
suspicious_behaviour - Visitors exhibiting unusual, abnormal, or potentially abusive behaviour patterns detected by Blackwall’s analysis engine. This category may include excessive request rates, behavioural anomalies, suspicious navigation patterns, or activity commonly associated with automated abuse or account compromise attempts. Administrators can apply additional protections such as CAPTCHA challenges, encryption, or outright blocking to reduce the risk posed by suspicious traffic.
-
-
For the rule that you choose to modify, select a dropdown field that corresponds to your desired behaviour. The available dropdown options are:
- Grant access
- Deny access
-
For L7 DDoS Protection (S2) in the Security section, select one type of protection to implement in your package by placing a check in the corresponding checkbox:
- ddos_protection - Enables basic Layer 7 DDoS mitigation for the protected domain by limiting the number of simultaneous connections and the rate of requests from a single IP to help prevent volumetric or application-layer DDoS floods.
- ddos_protection_advanced - Enables additional Layer 7 DDoS protection for more advanced application-layer attacks. If enabled, GateKeeper will block attacking IPs at the firewall level for the entire cluster—returning a TCP RST or UDP rejection instead of serving HTTP 403 pages. Use this only if your site has experienced large-scale DDoS events.
- Optionally, place a check in the Web Application Firewall (S3) checkbox in the Security section. Then use the dropdown field to select whether you want to grant or deny associated security_issues.
-
Optionally, place a check in the Custom Rules (S4) checkbox in the Security section. Then use the dropdown field to select whether you want to enable or disable the custom-rules feature.
Custom Rules are different to Blackwall's Core Rules. Whilst our default Core Rules greatly decrease bot traffic for your website(s), some visitor behavior might still present a cause for concern. This is where our Custom Rules engine can help you to eliminate those visitors from accessing your website. The Custom Rules engine may be used for bespoke purposes, but the main two purposes are:
- Whitelisting (unblocking) of currently blocked services and clients.
- Blocking of services and clients that currently have access to your site.
-
In the Performance section, select Content Caching (P1) when the package should include Blackwall content-caching capabilities. Then from the available features, optionally choose one or both:
- cache_dynamic_pages - If checked, GateKeeper also caches HTML pages and other 'dynamic' content for a configurable short period. Use with caution: caching dynamic content may cause delays in showing newly published data (e.g., blog posts, user-specific pages).
- cache_static_files - If checked, GateKeeper caches images, CSS, JavaScript, and other static files locally on the edge. This speeds up asset delivery and reduces load on your origin server.
-
In the Common Features section, configure the default feature settings to apply to websites assigned to the package. Depending on the available Blackwall API functions, these settings can include:
- early_hints — Allows GateKeeper to send HTTP 103 “Early Hints” responses during the initial TLS handshake, so that browsers can start preloading resources (e.g., CSS/JS) before the final HTML is delivered. This improves load times, leading to a faster browsing experience.
- ssl_certificates — Specifies the SSL certificate configuration, such as letsencrypt.
- enable_http3 — Enables HTTP/3 support for compatible browsers and clients. GateKeeper will speak HTTP/3 (QUIC/UDP) to compatible clients, improving performance on modern browsers and mobile devices. Leave unchecked if you need to disable HTTP/3 for compatibility or DDoS concerns.
-
force_https - Enable to automatically redirect all incoming HTTP (port 80) requests to HTTPS (port 443). When enabled, GateKeeper also adds security headers and rewrites
http://references in response bodies tohttps://. The recommended long-term solution is to configure the application to generate HTTPS URLs directly.Disable response-body rewriting while retaining Force HTTPS
If you need to keep HTTP-to-HTTPS redirection enabled but prevent GateKeeper from rewriting
http://URLs in response bodies:-
Back up the domain configuration:
-
Find each occurrence of:
-
For each occurrence found, comment it out:
-
Do not modify:
Leave Force HTTPS enabled.
-
Reload the NGINX configuration or restart the service.
Warning
HTTP URLs generated by the application may cause mixed-content warnings if they are used to load browser resources.
Updating the application to generate HTTPS URLs directly is the recommended long-term solution.
-
-
force_subdomain_redirect — Enables the configured subdomain redirection behaviour.
- https_upstream — Uses HTTPS when Blackwall connects to the upstream server. Clear this checkbox if Blackwall should connect to the upstream server over HTTP.
-
In the Component Common Features section, select the default website_status to apply to associated websites, such as active or paused.
- Review the selected components and optional features, and click Add to complete configuration of your new package.
- In the left sidebar, scroll to the Packages section and click Add a Package. Alternatively, use the search bar at the the top of the sidebar to search for Packages and from the filtered sidebar, click Add a Package.
The selected components and features determine which Blackwall security capabilities are assigned to websites using this package and made available to the corresponding cPanel users. These values are saved as the package defaults and applied to new and existing Blackwall websites associated with the package.
Note
You can create multiple packages containing different combinations of Blackwall components and default feature settings. This enables you to provide different protection levels according to customer requirements, service tiers, and budgets.
When a package is assigned to a cPanel account or domain, its selected components and default settings are applied to the associated Blackwall website. Changing the assigned package updates the Blackwall capabilities available to that customer.
Following successful execution of the previous steps, each associated cPanel account gains access to the Blackwall Protection settings in the cPanel web control panel. Refer to Using the plugin for instructions how to access and use the plugin.
Uninstalling the Plugin
Uninstall the plugin from your system by selecting the option which corresponds with your wishes and your operating system.
What happens during uninstallation?
The table below shows what is removed during each uninstall method.
| Uninstallation step | Description | Full uninstall | Limited uninstall (using --keep-config) |
|---|---|---|---|
| Hook Removal | Unregister all cPanel/WHM hooks associated with the plugin. | ✅ | ✅ |
| Binary Removal | Delete all plugin binaries and scripts from the system. | ✅ | ✅ |
| Restore DNS Zones | Revert all protected domains to their original DNS records using local backups. | ✅ | ❌ |
| GateKeeper Cleanup | Remove all registered domains and subaccounts from the GateKeeper API. | ✅ | ❌ |
| Configuration Removal | Delete all configuration files and DNS backups in /var/cpanel/config/blackwall. |
✅ | ❌ |
Uninstall using built-in script (recommended)
The recommended method to uninstall the plugin is using the built-in script:
-
Standard uninstallation (removes all data and restores DNS):
sudo blackwall-uninstall -
Uninstall while keeping configuration files and DNS backups:
sudo blackwall-uninstall --keep-config
Uninstall using package managers
You can also use standard package managers. To preserve configuration files, use the KEEP_CONFIG environment variable:
To uninstall and remove the package and configuration files:
1. Uninstall and remove the package:
Alternatively, to uninstall but keep configuration files and DNS backups:
Note
For informational purposes,the plugin files install to the following directories:
- WHM: /usr/local/cpanel/whostmgr/docroot/cgi/blackwall-protection/
- cPanel: /usr/local/cpanel/base/3rdparty/blackwall-protection/